Vue3 × Unity WebGL 整合實戰紀錄

Vue3 × Unity WebGL 整合實戰紀錄

前言

  • 使用 Vue 作為前端框架
  • 使用 Unity 製作 WebGL 遊戲
  • 實作 Vue 與 Unity 雙向溝通
  • 玩家可從遊戲大廳 Lobby 自由切換遊戲

經過整合後,能讓瀏覽器直接載入 Unity 遊戲,無需安裝 App,即可順暢遊玩。


環境版本

項目 版本
前端 Vue 3 + TypeScript
遊戲引擎 Unity 2021.3.22f1 LTS
WebGL Plugin Marinerer/unity-webgl

技術流程說明

Unity Build

  1. 設定 WebGL Build Target
  2. 調整 Player Settings 以壓縮與最佳化
  3. Build 出 .loader.js, .framework.js, .data, .wasm 等檔案
  4. 於網頁中引用與載入

👉 如何設定 Unity 打包最佳化?請點我跳到下方教學

Vue3 整合

  1. 使用 unity-webgl npm 套件封裝 Unity 載入
  2. 雙向溝通:
    • Vue 傳訊息給 Unity
    • Unity 回傳資料給 Vue
  3. 確保每次切換遊戲時完整釋放 Unity 實例,避免記憶體洩漏

Vue 端主要程式碼

載入 Unity 遊戲

1
2
3
4
5
6
7
8
9
10
11
12
13
14
15
16
17
18
19
20
21
22
23
24
25
26
27
28
29
30
31
32
33
34
35
36
37
38
39
<script setup lang="ts">
import { ref, onMounted } from "vue";
import UnityWebgl from "unity-webgl";
import Swal from "sweetalert2";
import { useRouter } from "vue-router";

const unityContext = ref<InstanceType<typeof UnityWebgl> | null>(null);
const router = useRouter();
const wait = (ms: number) => new Promise(resolve => setTimeout(resolve, ms));

onMounted(() => {
Swal.fire({ title: "遊戲載入中", html: "載入進度:<b>0%</b>", allowOutsideClick: false, showConfirmButton: false });

const basePath = import.meta.env.VITE_APP_PROXY_URL;

unityContext.value = new UnityWebgl("#unity-canvas", {
loaderUrl: `${basePath}/Build/Project.loader.js`,
dataUrl: `${basePath}/Build/Project.data.unityweb`,
frameworkUrl: `${basePath}/Build/Project.framework.js.unityweb`,
codeUrl: `${basePath}/Build/Project.wasm.unityweb`,
});

unityContext.value.on("progress", (progress: number) => {
const percent = Math.round(progress * 100);
const content = Swal.getHtmlContainer()?.querySelector("b");
if (content) content.textContent = `${percent}%`;
});

unityContext.value.on("mounted", () => {
Swal.close();
});
});
</script>

<template>
<div class="unity-container">
<canvas id="unity-canvas"></canvas>
</div>
</template>

特別注意:

.loader.js, .framework.js, .data, .wasm 檔案路徑需要正確。

我的檔案帶有 .unityweb 是因為使用 Unity 壓縮功能(Gzip)。

另外我用 SweetAlert2 (Swal) 顯示遊戲載入進度條,若不需要可以自行省略。

Vue 發送資料給 Unity

1
2
3
4
5
6
7
8
9
10
11
const sendPlayerDataToUnity = () => {
if (!unityContext.value) return;

const playerData = {
action: "GameTurnOn",
msg: { playerName: "player", score: 0 },
};

unityContext.value.sendMessage("VueMsgProcessor", "ReceiveMsgFromVue", JSON.stringify(playerData));
};

這裡我傳遞玩家暱稱與歷史分數。

兩邊協定好資料格式就行了!

Unity WebGL 端主要程式碼

Unity 呼叫 Vue

1
2
3
4
5
6
7
[DllImport("__Internal")]
static extern void SendMessageToVue(string message);

public void ProcessSendMessageToVue(string action, object pack) {
var json = JsonConvert.SerializeObject(new MsgPack(action, pack));
SendMessageToVue(json);
}

這段程式讓 Unity 可以從 C# 呼叫網頁端 (Vue) 的 window.SendMessageToVue 函數。

Unity 接收 Vue 傳來的訊息

1
2
3
4
5
6
public void ReceiveMsgFromVue(string msgPack) {
var container = JsonConvert.DeserializeObject<MsgPackContainer>(msgPack);
if (msgHandlerTable.TryGetValue(container.action, out var handler)) {
handler.Invoke(container.msg);
}
}

這裡會根據 action 決定觸發哪個遊戲內邏輯,例如開始遊戲、載入玩家資料等。

Unity 傳送資料到 Vue

1
2
var json = JsonConvert.SerializeObject(new MsgPack("GameFinish", new { score = 100 }));
SendMessageToVue(json);

傳送內容包括:

  • action:動作名稱,例如 GameFinish

  • msg:可自訂成績、玩家 ID 等附加資訊

Vue 端接收訊息

1
2
3
4
5
6
unityContext.value.addUnityListener("SendMessageToVue", (message: string) => {
const data = JSON.parse(message);
if (data.action === "GameFinish") {
console.log("🎯 遊戲結束,成績:", data.msg);
}
});

這樣就完成了 Unity → Vue 的資料傳遞!
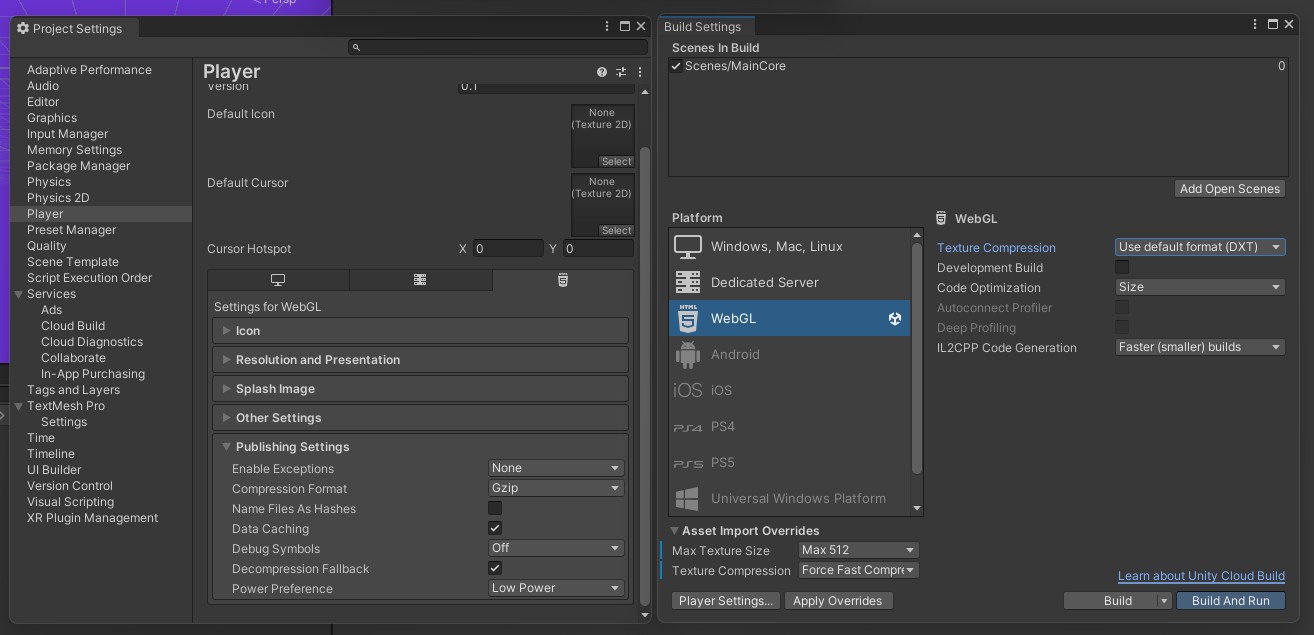
補充、Unity WebGL 打包設定

Build 範例

項目 建議設定 說明
Compression Format Gzip 相容性好,瀏覽器通用
Decompression Fallback 開啟 防止老舊瀏覽器問題
Name Files As Hashes 開啟 支援 Cache Control
Debug Symbols Off 移除 Debug,減少包體
Enable Exceptions None 或 Explicit 減少例外支援以減小體積
Code Optimization Size 以體積最小為優先目標
Max Texture Size 1024 或以下 減少貼圖資源,提升初次載入速度

本文作者: 我的名字叫劉穎,也可以叫我 Alan
本文連結: https://hi-alan-liu.github.io/blog/Vue3-Unity-WebGL/
版權聲明: 本站所有文章除特別聲明外,均採用 CC BY-SA 4.0 協議 。轉載請註明出處!